Mark Bittman's No Knead Bread | The Novice Housewife

Mark Bittman's No Knead Bread | The Novice Housewife Mark Bittman's No Knead Bread | The Novice Housewife
A mother is a person who seeing there

are only four pieces of pie for five people,

promptly announces

she never did care for pie.

~Tenneva Jordan

I read this quote a few days back and found it so true. It sums up every mother so well! And especially mine!

Happy Mother’s Day mom! I hope you know how much you mean to me.

Love you and sorry for all the trouble I keep giving you!

 You will always be the best human being for me.

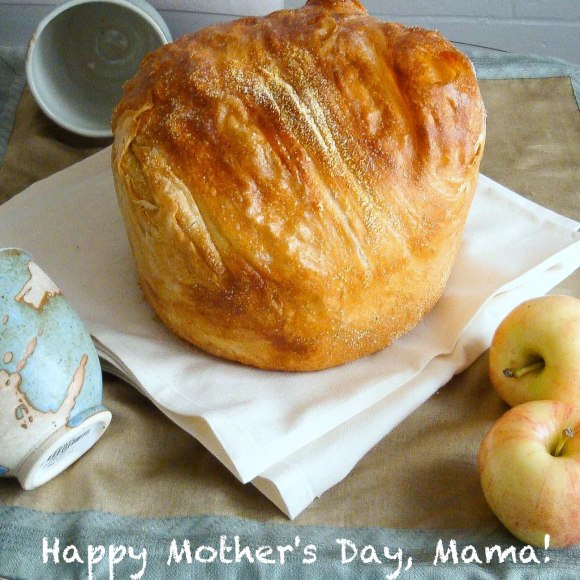
Hope one day I can sacrifice my piece of pie for you. Till then, here’s a whole bread for you!

Mark Bittman's No Knead Bread | The Novice Housewife

I recently downloaded Mark Bittman’s iPhone app, How to Cook Everything. And, the first recipe that caught my eye was Jim Lahey’s No- Work Bread.  Quoting Bittman, who used to write the food column The Minimalist for the New York Times, the introduction for this bread goes as follows:

This innovation- the word “recipe” does not do the technique justice- came from Jim Lahey, owner of Sullivan Street Bakery in NYC. Jim has created a way for home cooks (and not even ones who are serious bakers) to nearly duplicate an artisan bakery loaf, with a crackling crust, open-holed crumb, light texture, and fantastic flavor. All without kneading, fancy ingredients, or special equipments.

Mark Bittman's No Knead Bread | The Novice Housewife

Bittman’s description is bang on target. The beauty of this bread- it needs no kneading- you just mix everything together- sit it out in the refrigerator or outside if the temperatures are cool- take it out the next day, shape into a ball and let it bake! And you have a crusty, heavenly smelling bread. A wet dough, along with slow fermentation is the secret to its yeasty flavor and open crumb.

You do need to plan ahead for this bread. It is a 24- hour long process, but you would be in the kitchen for only 15 minutes working on it.


Mark Bittman's No Knead Bread | The Novice Housewife

from the original post.

The method involves the bread to be baked in a covered pot in the oven. One could use a dutch oven but I do not own one. I used a crock pot. The crockpot website says that if the pot/crock is detachable you can use it in the oven. Instead of the lid I used aluminium foil. It worked for me but you should try it at your own risk!

True to myself, I goofed up while transferring the dough to the crock pot. But, you guys be careful and keep the seam up, to get a beautiful crack on the top of the bread. So that you can brag about how professional you have become at bread making!

I have made the basic version, which makes a fantastic bread, but of course, you can  be more adventurous with the  formula and use whole-wheat and other flours and different seeds to make it to your liking.

*UPDATED* (March 2014) : I tried this bread by substituting 1 1/2 cups of the bread flour with a mix of whole wheat flour, soy flour, flax seeds, wheat germ, barley flour that I use. And it still turned out great. The updated pictures are from that loaf. Also, I now do own a dutch oven. This one, in case you are wondering- Lodge Double Dutch Oven and Casserole with Skillet Cover

Mark Bittman's No Knead Bread | The Novice HousewifeMark Bittman's No Knead Bread | The Novice Housewife

JIM LAHEY' NO-WORK BREAD
 
Author:
Ingredients
  • Ingredients
  • 3 cups all-purpose or bread flour, plus flour for dusting (400 gms)
  • ½ tsp scant instant yeast
  • 2 tsp salt
  • 2 cups water at 70 F
  • 2 tbsp extra virgin olive oil (optional)
  • cornmeal/semolina/wheat bran, as needed
Instructions
  1. Combine the flour, yeast, and salt in a large bowl. Add the water and stir until blended. The dough will be sticky and that's how it should be(add a little more water if it seems dry). Cover the bowl with plastic wrap, or transfer the dough to another greased bowl, and turn the dough to coat with oil. Cover with plastic wrap.
  2. Let rest for about 18 hours at about 70 F. (You can put it in the refrigerator overnight and about 5-6 hours before you want to bake it.)
  3. Lightly flour a work surface, remove the dough and fold once or twice; it will be soft, but once sprinkled with flour, not terribly sticky. Cover loosely with plastic wrap, and let rest for about 15 minutes.
  4. Using just enough flour to keep the dough from sticking, gently and quickly shape the dough into a ball. Generously coat a cotton (not terry cloth) towel with cornmeal. You can use silpat like I did. Put the dough seam down on the towel and dust with more flour or cornmeal. Cover with another cotton towel (or plastic wrap) and let risefor about 2 hours.
  5. When it's ready, the dough will be more than doubled in size and won't spring back readily when poked with your finger.
  6. At least half hour before the dough is ready, heat the oven to 450 F. Put a 3-to-4 quart covered pot (with the cover)- it may be cast-iron, enamel, pyrex, or ceramic- in the oven as it heats.
  7. When the dough is ready, carefully remove the pot from the oven and turn the dough over into the pot, seam side up. (It's messy, and it probably won't fall in artfully, but it will straighten out as it bakes.)
  8. Cover with the lid and bake for 30 minutes, then remove the lid and bake for another 20-30 minutes, until the loaf is beautifully browned. (If you feel the bread is scorching, lower the temperature.)
  9. Let the bread cool for at least 30 minutes before slicing.
Mark Bittman's No Knead Bread | The Novice Housewife

from the original post


Tres leches is a light airy sponge cake, soaked in three kinds of milk- evaporated milk, condensed milk, and heavy cream. 

Tres leches Cake

Updated June 29 2017: 

This tres leches cake has been a favorite of mine ever since I posted it for the first time in 2011.  I made it again recently and thought will update the post with recent pics of the tres leches cake and have added a printable recipe as well for this three milk cake.  As always, have kept a picture that went along with the original post of tres leches cake (the one at the end), to remind myself how much I have grown in terms of photography and styling and how much more I can grow. 

Original post dated May 5, 2011:

I am back with Office Thursdays. Office Thursdays was something I started to solve the problem of me baking and then having no one to eat it since V is not fond of sweets. As a result, I would end up eating most of what I baked, and you all know what havoc that does to your body. Of course, I could have just not baked at all- but I love baking and I do crave for the occasional freshly baked good- not what you get in stores but what you get fresh from the oven in your house! So some solution had to be found- one that would allow me to bake but not end up with all the calories that go into it. Thus, the idea of Office Thursdays (at that time I could come up with no better name and so it stuck) came up. Every Thursdays, V has a meeting that he conducts, and several of his co-workers attend it. So, V and I decided that I would bake for these meetings and save for two-four pieces (for the two of us), rest would be served at these meetings.

Tres leches Cake


For today’s office Thursday, since it is cinco de mayo (a Mexican holiday celebrated every 5th of May to commemorate Mexican victory over the French forces in Battle of Puebla, 1862) and a lot of people at V’s office are mexican, I thought of making a traditional Mexican dessert- Tres Leches Cake. Of course, it might have been a very wrong decision- they would know how it actually tastes, so I had to turn to the best-Alton Brown. His measurements were in weights and since I do not own a weighing scale (and I call myself a passionate baker!) , I found a recipe I could work with at Brenda’s blog. Brenda has a beautiful blog and an amazing collection of recipes. Do check her out.

Tres Leches Cake: Tres in spanish means three and leche means milk. So the cake roughly translated is three milk cake. The cake is a sponge like cake that is drenched in a glaze of three different kinds of milk- condensed milk, evaporated milk and half & half. Topped with a whipped cream frosting, you can make several variations to the cake by either adding chocolate, or layering some strawberry whipped cream in between or like Brenda, adding cinnamon to the batter. No matter what you do, you will still be licking your fingers away!

This cake also goes out to one of my blogger friends, Abhi and to the girl who introduced me to his blog (one of my best friends, Elgo), both of whom had their birthday in April! I had promised Abhi a cake, so here it is! I would have made a more extravagant cake- firstly, if I knew how to and secondly, had these guys been here to eat it. Now, Abhi, for whatever reason, does not blog regularly but I have seen the pics of his culinary adventures on Facebook and they all look so mouth watering good. I wish he would blog more often so that I get to learn more from him and not just sit and admire his pictures on FB.

Tres leches Cake


Now, typical to all my new baking adventures I erred here too. I had kept the eggs out in the morning so that they would be at room temperature by the time I was ready to bake the cake in the afternoon. But, when I added them, the eggs were cold, solidifying the butter a bit. Arghh!! What do I do now! I took the bowl and hugged it, hoping my body heat would help the eggs and the butter to come back to room temperature. And well it did work! A hug can melt anyone and this just proved it!

The cake is seriously addictive. While photographing I kept on eating piece after piece. Granted I was hungry after the exercise but one piece would have worked, but I just could not resist! I happily packed these for V’s office-  finally there is some one to take these baked goods off my hand!

The recipe is adapted from here.

Tres leches Cake

Read More →

It’s that time of the month again. The Daring Bakers’ challenge time. I joined the Daring Baker (here on referred as DB) gang in February. I could not complete my first DB challenge. For the March challenge I posted late (all DB members have to post their version of the challenge recipe on the 27th of every month irrespective of when they complete the challenge).  So for the April DB challenge, I really had to get it right and that too on time. Luckily I was at my parents house and not traveling so I got the time to complete the challenge.

The April 2011 Daring Bakers’ challenge was hosted by Evelyne of the blogCheap Ethnic Eatz. Evelyne chose to challenge everyone to make a maple mousse in an edible container. Prizes are being awarded to the most creative edible container and filling, so vote on your favorite from April 27th to May 27th at http://thedaringkitchen.com!

You do not get maple syrup where my parents stay and places in India where you do get it, it is pretty expensive. Luckily, my mom had a bottle of maple syrup which she grudgingly allowed me to use, else I would have had to sit this one out too. I did have a lot of ingredient and other technical issues though because of which things I would have liked to make as containers I couldn’t. It was fun nonetheless.

Since I am still learning my way with gelatin, I did experience some problem with the cooking of the mousse and thought it wouldn’t set but the next day when I checked it had set. I made three different types of mousses to go with the different containers I planned. I divided the mousse into three parts and added flavorings accordingly. To one part I added garam masala, the other I left plain and to the third I added instant espresso powder.

I have made sugar bowls (for my homemade coconut ice cream) and bread tartlets (with caramelized onion fillings) in the past which would have made excellent pairings with the maple mousse (though would suggest you to make some changes in your maple syrup if you using the sugar bowls- it would just become too sweet). But since we were not supposed to use anything from previous posts I came up with the following four containers for this creamy, sweet maple mousse.

One, I made with cucumber and carrots, that I boiled and placed on a plate and microwaved between paper towels with a weight on top (to absorb the water that the vegetables have naturally) . The result was this paper-thin vegetable bowls- which were beautiful (The idea for this came from something I read about vegetable papyrus sometime back). I think they are a very easy and attractive way to dress up any appetizer/dessert. The crispiness of the vegetables contrasted well with the delicateness of the mousse. Also, since I read that the mousse will be very sweet (I did reduce the amount of sugar called for), to pair it with the paper thin vegetable bowls I added a heaping teaspoon of garam masala. I think the taste was great!  You could glaze the bowls at time of serving with some maple syrup to give a nice flavour to the bowls.

One could come up with several variations of these bowls. Even orange rind would be a great combo. I wanted to make zucchini paper bowls as well as lotus roots paper bowls since I though they would pair up well with the sweet mousse but finding ingredients where my parents stay was a task. So I stuck to what I had on hand and with the garam masala mousse the cucumber and carrot bowls were great.

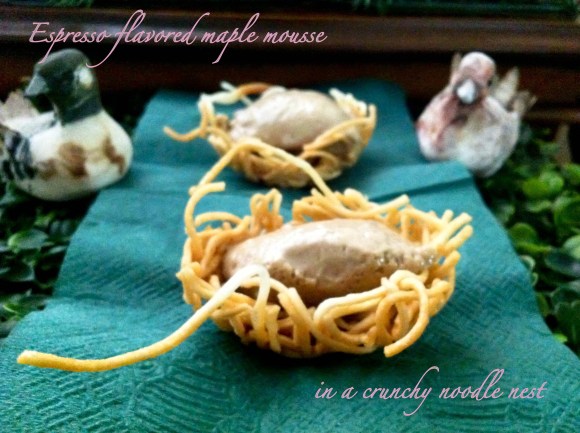
My second attempt at edible containers were nest bowls from noodles. I thought the noodles would give an excellent crunchy and salty contrast to the mousse and oh boy I was right. I paired the noodle nest bowls with the espresso mousse. (While photographing I realised that the mousse actually looked like an egg- making it a fabulous addition for an Easter Day spread!). The espresso mousse was divine. Maple and coffee are a wonderful combination.

I wanted to make waffles bowls to pair with the plain maple mousse but since the waffle iron that my mom has, was packed in some trunk in the garage, I was not be able to make them. Also, since I am not a fan of bacon I did not try any bacon bowls- but I am sure those who like bacon would love the mousse with the bacon.

My plain mousse did not set properly, as a result of which I thought of freezing the mixture for my third shot at an edible container. I decided to make some maple mousse filled white chocolate bites. I put a little melted white chocolate in an ice cube tray. Added some mousse and topped with a mix of white chocolate and dark chocolate and froze the mixture. It made delicious bites.

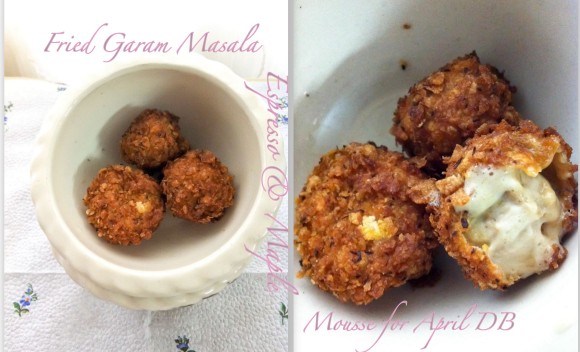
My fourth edible container was a take on fried ice cream- a Fried Maple Mousse. I had some mousse left of each kind. So, I mixed it all up, all the while thinking- what am I doing mixing garam masala plus coffee plus maple syrup- I can’t be thinking straight, can I? Surprisingly, it tasted quite good. And combine this with deep fried goodness- voila! you have a great dessert!

My favorite, purely based on taste, among the four containers was the espresso mousse in the noodle nest bowl. The prettiest, of course, were the paper thin vegetable bowls. My parents and I had a fun time devouring all the versions.

I was blown away by everybody’s creativity for this challenge. Some really awesome and innovative edible containers. The DB group is a talented lot and be sure to check out everybody’s creation on the Daring Bakers’ site.

I am sorry for not having any pictures for the method I used to make each container. It was the first time I was trying each version and was not sure whether I will be able to pull each off. But, I will try to explain it in the best possible way I can.

Read More →