Look at me! While ranting about trying to lose weight, losing a ring and other mundane stuff I forgot to mention about my winnings in Vegas. Ooh yes, baby, I won, gambling in Vegas. To tell you the truth, I did not forget but I was in a double mind to mention it- since I do not want to endorse gambling on such a public forum (yes, yes I am the morally right kind of person 😉 ). So why mention today. Well, the reason why I mention it today is that I put my winnings into buying a new cookbook! Well, its funny because I remember telling V before leaving for Vegas that I’ll only play for enough money to buy this cookbook that I had been eyeing for some time now (people gamble for the enjoyment, to pay debts, buy drinks, while I play to buy cookbooks 🙂 ) . And that’s exactly what happened! I won only enough to buy me that book. This was destiny. That book was in my destiny! God wanted me to have it. So even though I just played twice on the slot machine- the moment I hit my target amount I immediately encashed it. No, this time I was not going to be greedy.
A few days back, the book (that I bought from my hard earned money), arrived in a shipment from Amazon. Happy and excited, I opened the package, and behold the beauty! There it lay Sarabeth’s Bakery From My Hand to Yours Sarabeth’s Bakery: From My Hands to Yours – in a large white colored cover with a simple yet beautiful picture of a lady whose hands are shown holding a batch of freshly made brioche in her apron! Yes, it had me floored. For the first few moments I was just flipping through the pages, feeling the smooth and crisp paper, oggling at the beautiful pictures (I am such a sucker for cookbooks!). 🙂
It was on my bed side table that night, and I read through the first few pages and instantly knew I made a good decision in buying this book. The book is designed with elegant simplicity. Her tips and techniques are what makes this book worth buying. I do wish though she had included the recipe for her famous orange-apricot marmalade that kick started her career.
Yesterday I chose to try Sarabeth’s version of Puff Pastry.
As Sarabeth describes:
With countless amazingly, thin, buttery layers that shatter when bitten into, puff pastry is the classic layered dough.
The secret to Sarabeth’s dough is that she uses heavy cream instead of water. Ok! I know what you thinking- “heavy cream! Wasn’t it fatty enough with the butter! “. But Sarabeth believes that the added butterfat from the heavy cream gives the pastry another dimension of flavor and crispiness. Hmmm.. It just means I have to gym harder!
You can use puff pastry in a number of things. It can be used in making palmiers, tarts, mille-feuille. I will be using it to make Apple Turnovers to send to V’s office. (That’s why I am not too worried about the butter and the heavy cream going in the dough- as long as I don’t have to eat them all!)
PUFF PASTRY 101
The dough should be made at least 2 days before using. It has two parts the D’etrempe and the Beurrage
The D’etrempe
- 2 cups all-purpose flour, plus extra for rolling out the dough
- 1/2 tsp salt
- 1 1/3 cups heavy cream, start with 3/4 cup and add more as needed
The Beurrage
- 340 grams (3 sticks) unsalted butter, chilled and cut into pieces
- 3 tablespoons all purpose flour
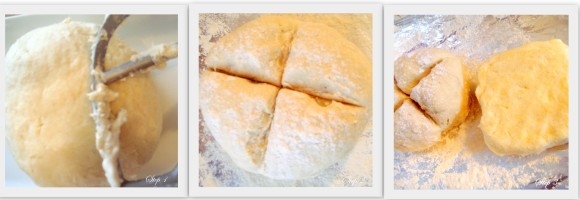
- To make the d’etrempe, in a bowl, mix together flour and salt. On low speed, add enough of the cream to make a stiff but a sticky dough. Be careful as to now over mix. Once everything has been mixed, transfer dough onto a clean surface and knead a few times till you get a smooth dough. Mark an X to make four quadrants.
- Transfer dough to a sheet pan dusted with flour. Cover with clingwrap and set in the refrigerator.
- To make the beurrage. Place the butter in a bowl and beat on medium speed until the butter is almost smooth, about 30 seconds. Add the flour and beat until mixture is malleable, about 30 seconds more. Transfer the butter mix to a lightly floured surface and shape into a 4-inch square. Refrigerate for about 15-25 minutes. The d’etrempe and the beurrage should have similar consistency and temperature after this slight chilling.
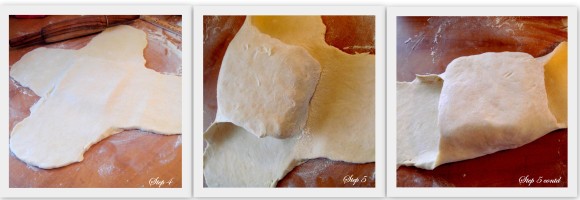
4. On a floured surface, place the dough. Using the heel of you hand, flatten and stretch each quadrant out about 2 1/2 inches as shown in the images. The area in the center should be thicker than the rolled out sides. Each of the flap should be about 6 inches long and 5 inches wide, leaving a raised square in the center.
5. Place the butter square in the center of the rolled out dough. Gently stretch and pull each flap to cover the top and sides of the butter square, brushing away any excess flour (see image). (cover the butter square as best as you can without tearing the dough.)
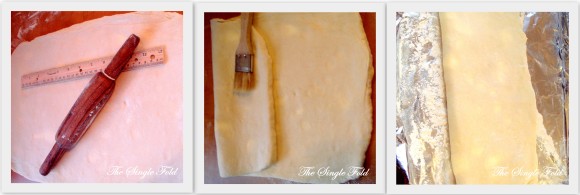
6. Dust surface with flour. Turn the dough over so the four folded flaps face down, the open seams should face you. Dust top of dough with flour. Slightly pound the top of the dough to widen it slightly and then roll dough into a 17 by 9-inch rectangle. Fold the dough in thirds like a letter (see image), brushing away excess flour (SINGLE FOLD). Roll lightly to compress layers and transfer pan to refrigerator for about 20 minutes.
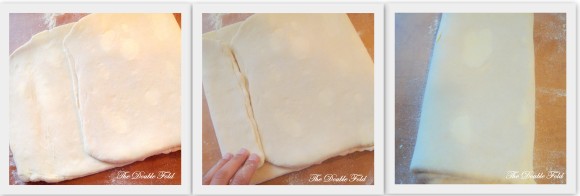
7. Dust surface with flour. Roll out dough into a 17 by 9-inch rectangle. Fold the right side of dough over 2 inches to the left. Fold the left side of the dough over to meet the right side. Fold the dough in half vertically from left to right. (DOUBLE FOLD). Roll dough slightly to compress layers. refrigerate for 20 minutes.
8. Repeat rolling and folding dough into a second double turn. Refrigerate for 20 minutes.
9. Repeat rolling and folding dough into final single turn. Cut the dough in half vertically. Wrap each dough tightly in plastic wrap, then wrap again. Freeze for at least 24 hours or up to 3 weeks. (By freezing the dough, the butter and flour layers firm up, resulting in an extra-flaky texture on baking. It also relaxes the dough better than refrigeration alone.)
10. The night before using the dough, transfer the frozen dough to the refrigerator and let thaw overnight, about 8 hours but no longer than 12 hrs.


I’ve always wanted to dabble in making puff pastry or breads so this is a wonderful post. Very insightful.
Thank u! Actually the credit should go to the book!
Hey Shumaila,
I got the link to your blog from Supriya (ur old classmate and my sister).
Great job with the blog. I love cooking and I think I am gonna be tempted to start making bread at home after checking ur blog.
But I really cant believe you actually made puff pastry!! thats quite an effort.
Hey! Thanks! Yup, puff pastry is quite a task- mainly because you have to keep the dough cold, so that the butter doesn’t melt. But, other than that it’s not that hard!
I have read the method in several other recipes too, but the thing is i am very confused as to which butter to use, is it that i should use butter that is ‘Dalda’, Margarine, or plain white butter that we call as Makhan (not the packed amul version). I always turn my puff pastry turn so pathetic at time 🙁
Hi Archie,
Sorry for replying so late, but have been busy and been having internet problems. 🙁
I used unsalted butter for the puff pastry. I am aware that in India we don’t get packaged unsalted butter, instead get Amul, which is salted. I did some research for you and the only difference between unsalted butter and salted butter is that there is better control of the salt being added to your baked good by using the former. Replacing salted butter for unsalted should not result any changes in the baking scientology (I don’t think that’s a word, but I hope you get what I mean!).
In my opinion (though I’m by no means an expert here), use Amul butter as described and skip adding the fine sea salt in the d’etrempe. Just make sure that the butter is chilled. I remember trying to make croissants in India once, and could not get the desired result because I had a very hot kitchen to work in- and believe me heat is your enemy while making puff pastry or croissant dough (I used amul butter for the dough that time). So, keep chilling the dough, the moment you feel the butter is softening. That’s the main reason I would not suggest working with dalda, margarine or white butter because I have no idea how good they would hold up!
Well, I hope the pictures help you with the turns! I do feel the Amul butter should be fine here, just make sure you have a cold work surface, butter, etc to work with! Even between turns if you feel the dough is becoming too warm, put in the refrigerator for a while and once chilled continue.
Pingback: September Daring Bakers’ Challenge: Croissants |
Pingback: Caramelized Onions, Mushrooms and Gruyere Tartlets «
Pingback: October Daring Bakers: Mille Feuilles |