 I am warning you before you start reading- this post is going to be long and its going to be sweet- very sweet!
There’s going to be chocolate.
Lots of it.
There’s going to be tragedy.
Plenty of it too.
And there are going to be cavities!
You bet! A lot of that too!
This is the exact kind of post my dentist would disapprove of.
And that is exactly why, my friends, dentists and I could never be friends!
The August 2011 Daring Bakers’ Challenge was hosted by Lisa of Parsley, Sage, Desserts and Line Drive and Mandy of What the Fruitcake?!. These two sugar mavens challenged us to make sinfully delicious candies! This was a special challenge for the Daring Bakers because the good folks at http://www.chocoley.com offered an amazing prize for the winner of the most creative and delicious candy!
The challenge this month was to try our hand at bonbons, truffles, chocolate bark, pate de fruits, honeycomb and any other candy we would like to make.
 I have always wanted to try my hand at making chocolate. I have made truffles in the past and once made a mousse filled chocolate (for Daring Bakers’) before, but never so much and never with the proper technique.
I did have problems though. Especially with the non-chocolate candy- the pate de fruits and the honey comb. And I would like to blame the thermometer- at higher temperatures if left for too long (which was the case with most non-chocolate candies), the thermometer would bail on me, showing 888.8 F! WTH! And it happened on both my attempts at pate de fruits and when I tried making honey comb.
Paté de Fruits is definitely not my forte.
Paté de Fruits (pronounced pat de fwee, which translates to fruit pastes) are bite-sized pieces of real fruit puree jellies (sometimes with the addition of jam and/or dried fruit) rolled in sugar.
My first attempt at Paté de Fruits was making blueberry-orange pate de fruits but they were a failure as they did not set to the right consistency. Instead, I used them as a filling for my white chocolate bonbons. The second time around I tried watermelon basil pate de fruits from this recipe but these also did not set up. All thanks to thermometer! (I would like to believe my technique was fine 🙂 )
I will definitely give pate de fruit another try but for now I have had a candy-making overkill and would like to get back to baking cakes and cooking savory stuff! And honestly, I prefer eating a whole fruit than its candy form. But, that fact aside, I would still like to know that I can make pate de fruit if I want to. Hence I will definitely be trying them again.
With the same logic, I’ll give honey comb another try as well.
I did get a faint honey comb structure on my candy but not like it should have been.

 So finally, the different candies I did make and were more successful than others were:
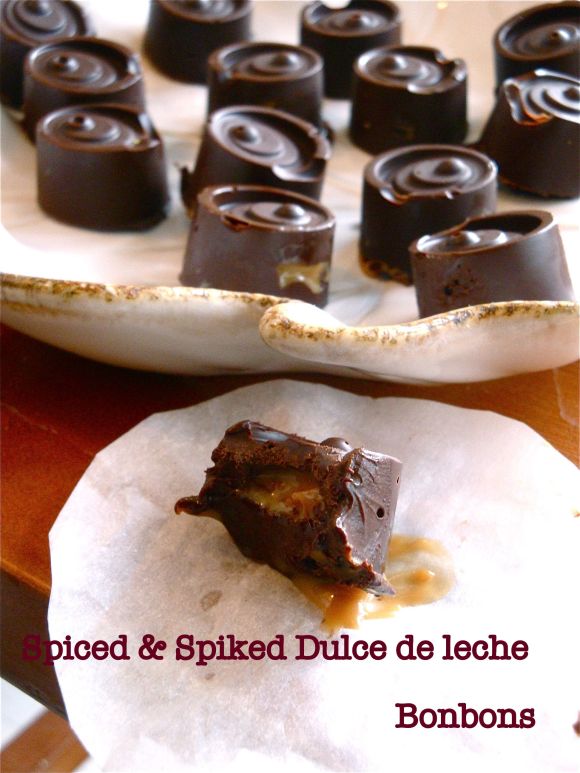
- Spiked and spiced Dulce de Leche Bonbons
- Chocolate green tea caramel bites
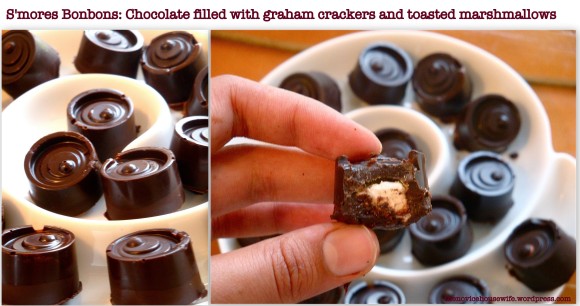
- S’mores bonbons
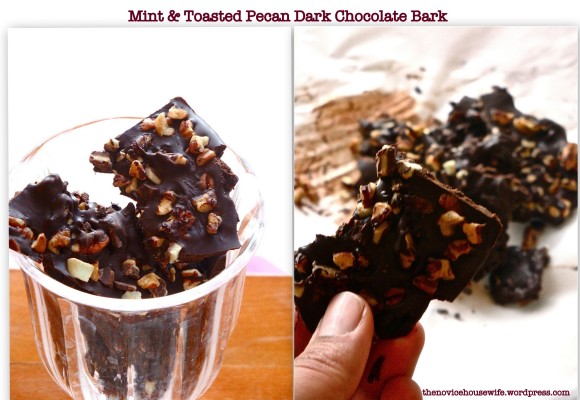
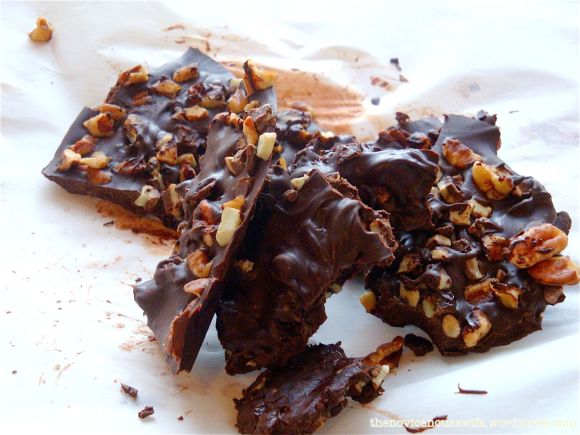
- Mint & toasted pecans chocolate bark
- Creme de menthe & pecan truffles
- Blonde rocky road
- Blueberry Orange Jelly filled white chocolate bonbons
- Dark chocolate filled with Malibu & Blueberry cashew marzipan white chocolate truffles
These were all packed and distributed. Of course, between the time they were made and delivered a lot of sampling happened. Something my dentist will definitely frown upon and my behind will regret very soon!

 Since for all the recipes I did not measure the exact amount of chocolate I used, and as some of the fillings were just an approximation, I am posting how tempering of the chocolate is done and how to make bonbons, chocolate bark and dipped chocolate in general. Wherever there was a proper recipe documented, I have mentioned it, for the rest a general idea is given.
TEMPERING CHOCOLATE USING THE “SEEDING” METHOD
Tempering is a method of heating and cooling chocolate in order to use it for coating or dipping. Proper tempering gives chocolate a smooth and glossy finish. Tempered chocolate will have a crisp snap and won’t melt on your fingers as easily as improperly tempered chocolate. Properly tempered chocolate is also great for molding candies because the candies will release out of the molds more easily and still retain a glossy finish.
Tempering Ranges:
Celsius
Dark: 45°C-50°C > 27°C > 32°C
Milk: 45°C > 27°C > 30°C
White: 45°C > 27°C > 29°C
Fahrenheit
Dark: 113°F-122°F > 80.6°F > 89.6°F
Milk: 113°F > 80.6°F > 86°F
White: 113°F > 80.6°F > 84.2°F
Two-third of finely chopped chocolate is melted and heated until it reaches 45°C / 113°F. One-third of un-melted chocolate is then stirred and melted in until it brings the temperature down to 27°C/80.6°F. It is then put back over heat and brought up to its working temperature of 32°C/30°C/29°C /// 89.6°F/86°F/84.2°F depending on the chocolate you’re using. It is now ready for using in molds, dipping and coating.
Tip: Make sure that your bowl fits snuggly into the saucepan so that there’s no chance of steam forming droplets that may fall into your chocolate. If water gets into your chocolate it will seize! Also, if you’re using the chocolate to dip a lot of truffles etc. which means the chocolate will be sitting off heat for a while it will naturally start to thicken as it cools. To keep it at an ideal viscosity for even coating, put the bowl over steam for 30sec – 1min every 10 – 15mins, just do not let the temperature go over the working temperature! Having the chocolate in a warmed glass bowl and wrapped in hot kitchen towel can also help keep the chocolate at its working temperature for longer.
1. If using colored cocoa butter and plastic molds, paint designs at the bottom of the wells in each mold. Let dry. You can also use lustre dusts mixed with a bit of extract or vodka, instead of colored cocoa butters for a nice sheen. Let painted molds dry.
2. When coating the molds with the tempered chocolate, I like to do it how the chocolate pro’s do it (much faster and a lot less tedious). While holding mold over bowl of tempered chocolate, take a nice ladle of the chocolate and pour over the mold, making sure it cover and fills every well. Knock the mold a few times against a flat surface to get rid of air bubbles, then turn the mold upside down over the bowl of chocolate, and knock out the excess chocolate. Turn right side up and drag a bench or plastic scraper across so all the chocolate in between the wells is scraped off cleanly, leaving you with only chocolate filled wells. Put in the fridge to set, about 5 to 10 minutes. Alternatively, you could take a small brush and paint the tempered chocolate into each mold, or spoon it in if you’d like.
3. Remove from refrigerator and fill each well with the filling of your choice. Again take a ladle of chocolate and pour it on top of the filled chocolate wells, knocking against a flat surface to settle it in. Scrape excess chocolate off the mold with the bench scraper then refrigerate until set.
4. When set, pop your beautiful filled chocolates out of each well and enjoy!
DIPPING IN TEMPERED CHOCOLATE
1. Temper the chocolate using either the marble top or seeding method
2. Once the chocolate is in temper, gently lower your truffle or candy into the tempered chocolate with your dipping fork
3. Gently remove the candy once it’s been fully submerged
Tip: It’s best to use a bowl that’s deep rather than shallow so that the truffle is easily covered
4. Tap fork on the side of the bowl to remove excess chocolate
5. Scrape off excess chocolate from under the dipping fork on the side of the bowl
6. Place dipped truffle/candy on parchment paper, decorate as you wish and allow to set
7. Once the chocolate has hardened, trim off any “feet” with a sharp knife
Tip: Try to handle the chocolate as little as possible or wear food safe gloves to that you don’t leave fingerprints on the chocolate
Tip: To help the chocolate to harden faster, you can place the chocolate into the fridge for 15-20mins, but avoid leaving them in for longer than that so as to avoid any “sweating” (water droplets forming on the chocolate)
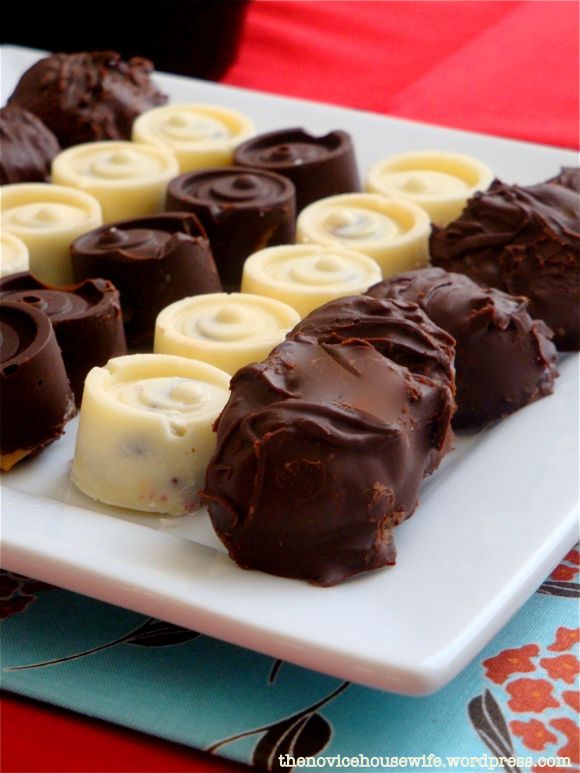 I made the following bonbons/dipped chocolate/truffles:
- Spiked and spiced Dulce de leche Bonbons: After tempering the chocolate, I added a heaped teaspoon of ground cinnamon to it which lent to the “spice” in the bonbon. And I spiked the homemade dulce de leche with 2 tbsp of Kahlua. These were my personal favorite, besides the green tea caramels and the blonde rocky roads.
- Creme de Menthe Chocolate & Pecan Truffles: I “tempered” creme de menthe chocolate chips (though I do not know if you can temper creme de menthe chips). And poured that into my molds and added crushed pieces of pecans in the middle and poured more melted creme de menthe chips.
- S’mores Bonbons: I tempered Dark chocolate and coated the molds with it and let it set. I then added a pinch of graham cracker crumbs and then a piece of toasted marshmallow and topped with the tempered chocolate on top.
- Blueberry Orange Jelly filled white chocolate bonbons: I tempered white chocolate and followed the steps for making bonbons. For the filling, I used the failed blueberry-orange pate de fruits jelly. It was a personal favorite of one of my friends who received a box of my chocolate assortments.
- Dark chocolate filled with Malibu & Blueberry cashew marzipan white chocolate truffles: I had no idea what to name them- hence the long name! I used 2 cups blueberry, 1 cup sugar, 1 tbsp orange juice, freshly squeezed and 2 tbsp liquid pectin and followed directions for the pate de fruits given in the Daring Bakers’ forum. Since it did not set, I added the blueberry-orange jelly with 2 tsp malibu, and 1/2 cup sweetened coconut and about 3/4 cup kaju katli (cashew marzipan) and added 1 cup of leftover tempered white chocolate. I dipped this truffle in leftover tempered dark chocolate. It was a leftover truffle. Maybe I should name it that!
MAKING CHOCOLATE BARK
Chocolate bark is really fun & easy to make (kids love making this stuff!). You can also decorate it with almost anything you like, nuts, dried fruits, seeds, crushed candies, honeycomb etc. The whole idea of chocolate bark is that it’s rough in texture and look, just like bark. You can cut it in neat squares, or my favorite, break it up in rough pieces. It’s also great to use up left over tempered chocolate, either plain or if you’ve mixed in crushed nuts to use for coating truffles.
1. Line a baking tray with parchment paper.
2. Temper your chocolate using your preferred method.
3. Once tempered, spread the chocolate over the parchment paper.
4. Sprinkle your ingredients over the chocolate.
5. Leave to set.
Tip: To help speed up the setting, you can put it in the fridge for about 15-30min. Don’t leave it in the fridge to avoid the chocolate from sweating (water droplets will form on the chocolate)
6. Either break or cut into pieces.
7. Store at room temperature in an airtight container.
I added creme de menthe chocolate chips and toasted pecans to make the bark.
Adapted from here
Garrett from Vanilla Garlic says “Cutting caramel is a methodical practice. Turn the sink on to a mere dribble and wait for it to heat to scalding. Run the knife under the water and patiently wait for the heat to transfer through the tang until the metal radiates in your hand. Quickly clean off the water with a towel and then cut through the brick of caramel. The piping hot knife should glide through effortlessly and leave the sides of each individual bite of caramel nearly seamless and smooth as cut class. Repeat for each cut.”
Ingredients
- Unsalted butter for the pan
- 1 1/2 cups heavy cream
- 1 1/2 cups sugar
- 1 cup plus 2 tablespoons light corn syrup
- 1 teaspoon salt
- 9 ounces bittersweet chocolate (99% dark preferable), finely chopped
- 1 tablespoon matcha green tea powder
Directions
1. Line a 7X11 pan with a piece of parchment paper (the paper will droop over the sides) and butter well.
2. Stir together the cream, sugar, corn syrup, and salt together in a heavy bottom pan. Bring to a boil and continue to cook until it reaches 250F. Remove from heat and let cool for a five minutes. Be careful when waiting for it to reach 250 F because it might flow over. And since I had to put it on low it took a looooooong time. I would recommend using a really deep bottom pan
3. Add chocolate and the green tea. Stir together and pour into the pan and spread with an offset spatula. Let the caramel sit for a few hours.
4. Cut apart into 1-inch squares. Serve or store in an airtight container.
Adapted from here
Makes 25 pieces
Ingredients
- 1 9-ounce bag butterscotch chips
- 1/3 cup creamy peanut butter (I used Skippy)
- 1/2 cup (1 stick) unsalted butter, cut into tablespoon-size pieces
- 1/2 teaspoon pure vanilla extract
- 1/8 teaspoon salt (fine sea salt or table salt)
- 2 1/2 cups mini marshmallows, divided
- 3/4 cup salted peanuts, divided (do not chop)
Directions
- Line an 8×8-inch square baking pan with a large sheet of aluminum foil, being sure to get it neatly into the corners of the pan.
- In a large, microwave-safe bowl, combine the butterscotch chips, peanut butter and butter. Microwave on 50% power for about 3 minutes. Stop to stir well. Since microwaves vary do keep an eye while melting the chips. Place back in the microwave for 1 minute and 30 seconds on 50% power and stop to stir again–it should be smooth after a bit more stirring. If not, give it a couple more 30 second bursts of high power and stirring until smooth.
- Stir in the vanilla and salt. Stir in 2 cups of the marshmallows and 1/2 cup of the peanuts until well-blended. Turn the mixture into the prepared pan and smooth with a spatula. Sprinkle the remaining marshmallows and peanuts evenly over the surface, and press lightly into the candy with your palms. Chill until set–15 minutes in the freezer or about an hour in the refrigerator.
- Remove the candy slab from the pan and cut into 25 squares. Store in an airtight container in the refrigerator for up to 1 week.




Wow you did an amazing job on this challenge. You’ll definitely be needing to see that dentist soon, I’m sure they were irresistible.
Thanks Barbara! 🙂
WOW!!!!! You have to make these in India for me!!!
Sure!
You were busy this month! S’mores bonbons? I think I might be in heaven! Those sound so tasty and perfect for when you don’t want to start a campfire!
Oh. my. goodness. How in the world did you find the time to make all these different candies? Amazing! You really went above and beyond for this challenge. Nice job! They look beautiful and sound delicious.
i’m so happy to see that the smores bonbons turned out great. i soooo wanted to make some, but ran out of energy, and patience. yours look great! I can’t believe how many candies you made! You rocked this! Great job!
Thanks so much for dropping by and appreciating! I loved your strawberry pate de fruits and the colour that they got! And of course the rock candy lollypops were so cute!
Amazing. You certainly overcame the thermometer issues and made a TON of delicious sounding candies. S’mores? My favorite. Rocky road blondies? YUM. Using your “failed” pate de fruit as bon bon filling? Genius. Seriously, each one looks and sounds fantastic. Great job on the challenge.
Thank you so much for dropping by and appreciating! I loved how your pate de fruits came out!
I am wishing I were there to help you sample these goodies! They all look beautiful. I totally want to try the s’mores truffles…. And the blueberry orange candies – great use of a “failed” experiment! Thank you so much for sharing all of your hard work!
Oh How I wish you were! Thank you so much for the comment! I am pretty surprised but of course, happy with the success of the white chocolate-fruit candies. They were a favorite of one of my friends with whom I shared a box of candies. 🙂 The s’mores ones were a big hit with a pregnant friend of mine. i was glad to have them off my hands!
Ahhh… I must have gained a kilo just by looking at these photos :))). So many varieties in here! Great pictures and wonderful recipes. Loved the Green Tea caramels the best.
Rajani
Thanks Rajani! I really liked the idea of green tea caramels and am glad they came out great as well!
This is one dentist who approves of the post 🙂
you did an amazing job…really WOW
I mean rocky road blondies..wow
Haha Thanks! Good to know I have a dentist on board. Wish all of them were like you though! My dentist just finds me so amusing and stubborn- he tries his best to get me off chocolate but it just won’t happen!
This is a ploy, isn’t it? You’re trying to make me fall in luuuuurrrrvvvveeee with chocolate, and you just might be succeeding! <3
Yay!!!:) 🙂
Wow, eight successful candies, that is incredible! They all sound delicious but I’m especially loving the blonde rocky road – peanut butter, butterscotch, AND marshmallows?! Yes please! Great job on this challenge 🙂
Thanks! The blonde rocky roads were great! And the best part was they were so simple to make! I loved your pairing of caramel-thyme and the strawberry rhubarb!
I love your idea with the Dulce de leche. Great job with the challenge!
Those were my favorites too! Thanks!
Wow! You have really outdone yourself. I am SO IMPRESSED. I think my favorites are the dulce de leche and white chocolate/fruit ones. I can see how you could end up in a sugar coma though! 😉 You just have to alternate, something salty, then a bon bon, something salty, then a bon bon 😉 Cheers!
Thanks! The dulce de leche were my personal favorite and I was quite surprised by the success of the white choc/fruit ones as they were just throw-alongs! And great advice on how to avoid the sugar overdose! But I won’t try it as I’ll just end up eating much more than my weight would permit me to!
You made so many delicious candies! I love them all!
As did you, Renata! Thanks for dropping by and appreciating!
I just love your chocolate mould! It’s such an interesting shape, just love it.
I particularly love the sound of your spiced & spiked dulce de leche treat, what a great idea. I also love that you turned lemon into lemonade and used your paté de fruit as a filling when it didn’t set up.
Thanks for taking part in the challenge, by the look of things you enjoyed yourself and I’m so glad that you did.
Great work!
Thanks for the challenge! It was something I really had been looking forward to doing! And, I love those moulds too! The spiced and spiked dulce de leche chocs were my personal favorite! Thanks again for hosting such a wonderful challenge and for the great tips on the DB forum!
Hi Shumaila,
I’m sorry the pate de fruit recipe didn’t work out, a good thermometer is definitely key when making any type of candies. You can test the pate de fruit by dropping a small amount into ice water; if it firms up quickly, you’ll know its ready. The watermelon recipe is particularly hard beacuse watermelon is very viscous — I would suggest using a denser fruit, that has some natural pectin, for your next try, like strawberries or apple. But great work on your chocolates! And good luck next time!
Yes, I do think I was a little ambitious with the watermelon and next time I’ll try with the strawberries. Thanks for the tips. Will keep them in mind for next time!
Your chocolates look great! I love all your great flavor pairings.
Thank you so much! 🙂
All of the chocolates that you made look wonderful and how I wish that I was part of your tasting team…but neither my dentist nor my waist line would have appreciated it so alas…
Lisa~~
Cook Lisa Cook
I wish you were there too- my waist is surely cursing me now and let’s not go to what the dentist will have to say!
Wow, you did a fantastic job. All of your candies look really delicious!
Thank you so much! Loved your healthy candy version too!
love the s’more bonbons!
I definitely need more chocolate tempering practice but had a great time with this challenge!
ceecee
http://www.withinthekitchen.blogspot.com
Thank you for stopping by and leaving such a sweet comment. You definitely got the look of all your candies right! They were beautiful!
Oh my god .. now i am wondering what do i do .. How do i get my hands on some of them .. they do – DO courier service … he he he
I ma drooling over it all now …
Thanks! How I wish I could courier them. My waist would have been more than happy to!
Shumalia – you are a candy master! I want ALL of your candy..all of your chocolates, but I’m realllly loving, of all things, your ‘leftover’ truffle, the dark chocolate filled with Malibu & Blueberry cashew marzipan white chocolate truffles. What I would give to taste one right now!! Thank you so much for candy making with us!
Oh Lisa, you are too kind with your words! Thank you so much for hosting such a wonderful challenge!
OMG!!!
And No more words 🙂
Thanks Rekha! 🙂
What amazing chocolates. Now I’m hungry …
YAY! congratulations on being the winner of the candy contest! Very well deserved!!
Congrats on winning the DB contest on your candy 🙂 They all look just heavenly, I would love to have been your taste tester for sure. Congrats again!
Pingback: Recipe Swap: Rabbit Manjus! |
Shumaila!! I am mesmerized by all the chocolate..how did I miss this post..I mean all that chocolate..is find of the month :)…you rocked this challenge I am sure because if it tastes even half as good as it looks, you got a winner 🙂
and I so want to and can eat all of that 😀
Pingback: Candy by rachealpatrolia - Pearltrees
Pingback: Apple Pie Tartlets/ Mini Apple Pies «