After a long time I am posting something for Daring Bakers’ (I was kind of scared I’ll be kicked out of the group since I missed so many of the previous ones but luckily that did not happen).
And am I glad that I did not miss this one. Because these Momofuku Milk Bar’s Crack pies are freakishly good….and addictive! I had the hardest time restricting myself to one piece. But restrict I did ( yup, sometimes my will power amazes me) and took a few pieces for my friends and packed the rest for one of V’s colleague.
Rachael from pizzarossa was our lovely June 2013 Daring Bakers’ host and she
had us whipping up delicious pies in our kitchens! Cream pies, fruit pies, chocolate pies, even crack
pies! There’s nothing like pie! 🙂
Having tasted Momofuku Milk Bar’s birthday cake truffles when I was in New York last year, and having made the Momofuku Milk Bar’s Funfetti Birthday Cake, I just had to try another recipe from their collection.
Plus, the name caught my attention. Of course it wasn’t fun explaining to my friends’ kids what they were eating. Thankfully my friends have experience and handled it. 🙂
Apparently the reason these goodies are called so is because they are as addictive as crack-cocaine. Since I have not tried crack-cocaine, I can’t say if that holds true but addictive these are. An outrageously gooey sweet butterscotch custard filling in a to die for thick chewy oatmeal cookie crust. I know, right !?! Drooooool.
And the texture is somewhat between a cookie and the toffee mix from a pecan pie except without the nuts. But seriously the star is the oatmeal cookie crust. Just make it for that. It’s worth it. And take small pieces. Your jeans will thank me later (after you stop cursing me that is)
So do you want some crack?
(Don't get any wrong ideas, I mean pie)
Momofuku Milk Bar's Crack Pie
Recipe Type: Dessert
Serves: 12
What Bon Appetit says about Crack Pie: “Anyone who has taken a bite of this Milk Bar best seller immediately knows the reason for the sassy name. Once you start eating this rich, salty-sweet pie with its oat cookie crust, you won’t be able to stop.”
Line a 13x9x2 inch/ metal baking pan with parchment paper. Also, lightly spray or
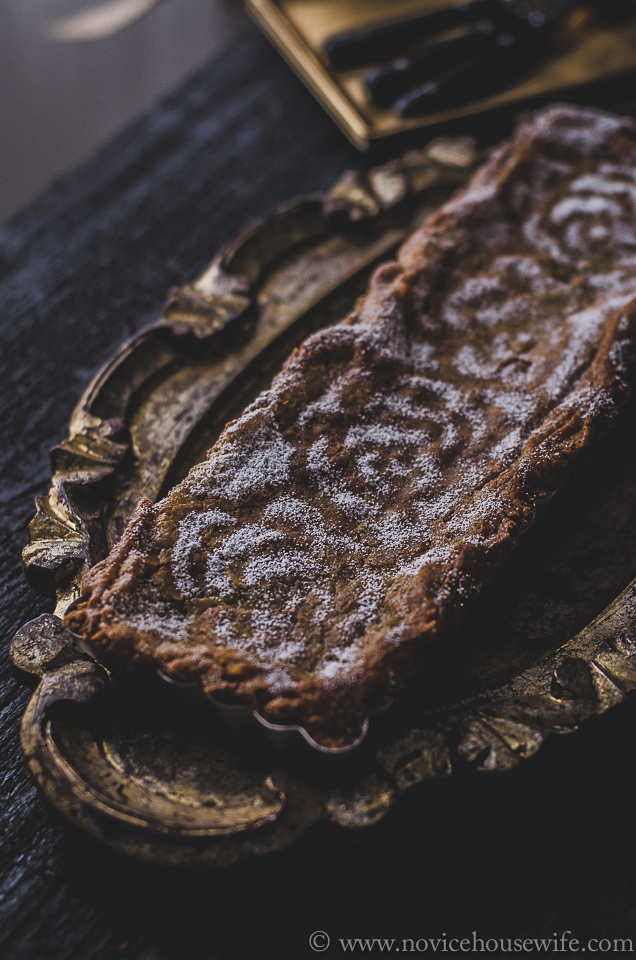
butter a 9 inch diameter glass or ceramic pie dish. I used my rectangular tart dish.
Combine 6 tablespoons (85 gm) of the softened butter, 4 tablespoons (50 gm) of the brown sugar and the white sugar in a medium bowl. Using an electric mixer, beat until light and fluffy, about 2 minutes.
Add the egg and beat until pale and fluffy, about 1 minute.
Add oats, flour, baking powder, baking soda, and salt and beat until well blended, about 1minute.
Dump oat mixture into prepared baking pan and press out evenly to edges of pan.
Bake until light golden, 18 minutes. Transfer baking pan to wire rack and cool cookie completely, about an hour.
Using your fingertips, crumble the cookie into a large bowl - there should be no identifiable pieces of cookie remaining. Add the remaining 3 tablespoons (45 gm) butter and 1-1/2 tablespoons (20 gm) brown sugar. Rub in with your fingertips until the mixture is moist and sticks together when pressed between your fingers.
Transfer cookie crust mixture to pie dish. Using your fingers, press mixture evenly onto bottom and up sides of pie dish (about 1 inch/2.5cm up the sides if your pie dish is deep). If your pie dish is shallow, place it on a baking sheet in case of overflow. (I had to do that, and if you are in doubt, I suggest you also place it on a baking sheet)
For the filling:
Position rack in center of oven and preheat to moderate 350°F/180°C. If possible, use bottom-only heat, or the filling may brown too quickly.
Whisk both sugars, milk powder, and salt together in a medium bowl.
Add melted butter and whisk until blended.
Add cream, then egg yolks and vanilla and whisk until well blended.
Pour filling into crust.
Bake 30 minutes (filling may begin to bubble up). Reduce oven temperature to
°F/160°C ( I actually reduced it to 300F and I think it worked out perfectly for me). Continue to bake until filling is brown on top and set around edges but center still jiggles slightly, about 20 minutes longer.
Cool pie completely in pie dish on wire rack. Chill uncovered overnight.
Sift powdered sugar lightly over top of pie. Cut pie into thin wedges and serve cold.